
Open Firehose on the computer where you installed it, or from your phone or another computer. Then check that your agent can start a session.
This page describes Firehose 1.0.1.
Before you begin
Section titled “Before you begin”You need a Firehose installation that you have installed and activated. Firehose runs on your own computer: your repositories and agents stay there, and your browser is how you work with them.
You also need an agent command-line tool, such as Claude Code or Codex, installed and signed in on that computer.
Open Firehose on your computer
Section titled “Open Firehose on your computer”Open http://localhost:4801 in a browser on the computer running Firehose. If you installed with --port, use that port instead.
Your projects and sessions appear once the page loads. If you see Activate Firehose, finish activation first.
This address works only on that computer. Another device on your home or office network cannot open it, even with the computer’s IP address.
Open Firehose from your other devices
Section titled “Open Firehose from your other devices”To use Firehose from your phone or another computer, turn on tailnet access. It uses Tailscale, a private network between your own devices, and serves Firehose over HTTPS with a certificate from Tailscale.
Only you can connect this way. Firehose answers only the Tailscale account that owns the computer. Anyone else who opens the address sees This Firehose only answers its owner over the tailnet.
Set up Tailscale
Section titled “Set up Tailscale”Tailscale connects your own devices to each other over a private network, called a tailnet. Every device you use with Firehose needs Tailscale installed and signed in to the same Tailscale account. You set this up once.
-
On the Firehose computer, install Tailscale from tailscale.com/download:
-
macOS: download the app, or get it from the Mac App Store. Open it and sign in.
-
Linux: run the install script, then connect the computer and follow the sign-in instructions:
Terminal window curl -fsSL https://tailscale.com/install.sh | shsudo tailscale up
-
-
On your phone or other computer, install Tailscale from the same page and sign in with the same account.
-
Check that MagicDNS is on. It is on by default for tailnets created on or after October 20, 2022. Otherwise, open the DNS page of the Tailscale admin console and select Enable MagicDNS.
-
On the same DNS page, under HTTPS Certificates, select Enable HTTPS. Firehose needs it to serve your address over HTTPS.
Enabling HTTPS publishes your computer names and your tailnet’s DNS name on a public certificate ledger. Tailscale asks you to acknowledge this before it turns HTTPS on.
For other platforms and details, see Tailscale’s installation guide and Enabling HTTPS.
Turn on tailnet access
Section titled “Turn on tailnet access”With Tailscale running on the Firehose computer, use one of these:
- During installation: answer
ywhen the installer asks to open Firehose from your other devices, or install with--tailnet. - In the terminal: run
firehose tailnet on. - In the dashboard: open Settings (the gear icon at the bottom of the icon rail on the far left). Under Open from your other devices, turn on Allow my other devices. If Settings says Restart Firehose to apply this., select Restart now.
When it is on, Firehose shows the address to use. It looks like https://your-computer.your-tailnet.ts.net:4801, where your-computer.your-tailnet.ts.net is a placeholder for your computer’s full Tailscale name. Under Open from your other devices in Settings, select Copy to copy it.
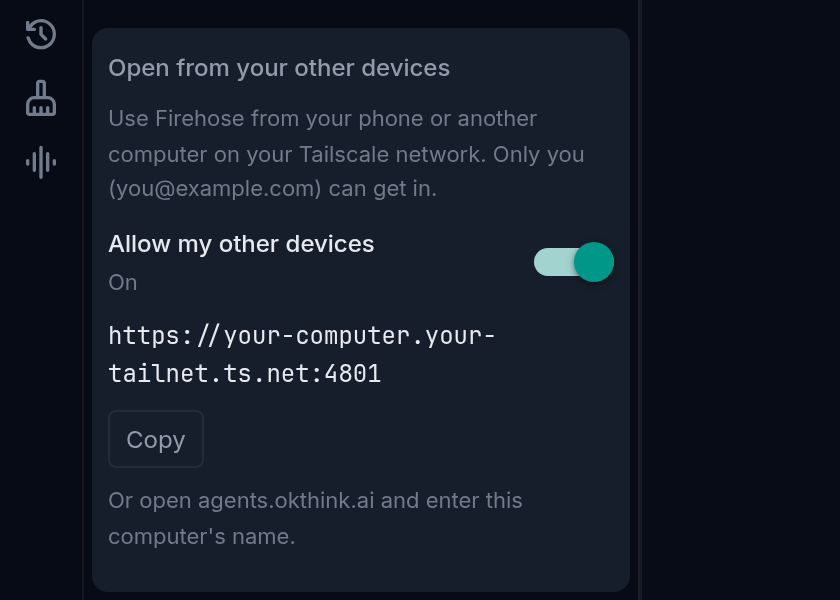
If Settings says Install Tailscale and sign in to use this. or Turn on MagicDNS for your tailnet in the Tailscale admin console., fix that in Tailscale first. MagicDNS gives your computer the .ts.net name the address uses.
Connect from the other device
Section titled “Connect from the other device”- Install Tailscale on the other device and sign in with the same Tailscale account.
- Open the address Firehose showed you.
- Check that your projects and sessions appear.
You can also open agents.okthink.ai, the hosted Firehose app, and enter your computer’s full Tailscale name:
- In the Connect to Firehose dialog, enter the name in Server address, such as
your-computer.your-tailnet.ts.net, withouthttps://or a port. - Select Save and connect.
The hosted app always connects on port 4801. If you installed Firehose on another port, open the address shown under Open from your other devices in Settings directly instead.
A short computer name or a Tailscale IP address does not work in the hosted app. Use the full name ending in .ts.net so it matches the HTTPS certificate.
To turn tailnet access off, run firehose tailnet off or turn off Allow my other devices.
Check that your provider is ready
Section titled “Check that your provider is ready”Select New session, the + button at the top right of the Sessions sidebar. In the New agent session dialog, confirm that your project appears at Pick a project, choose its workspace, and select the provider you installed. Its model choices should load. After you choose an available model and check permissions, Start session should open a session in that workspace.
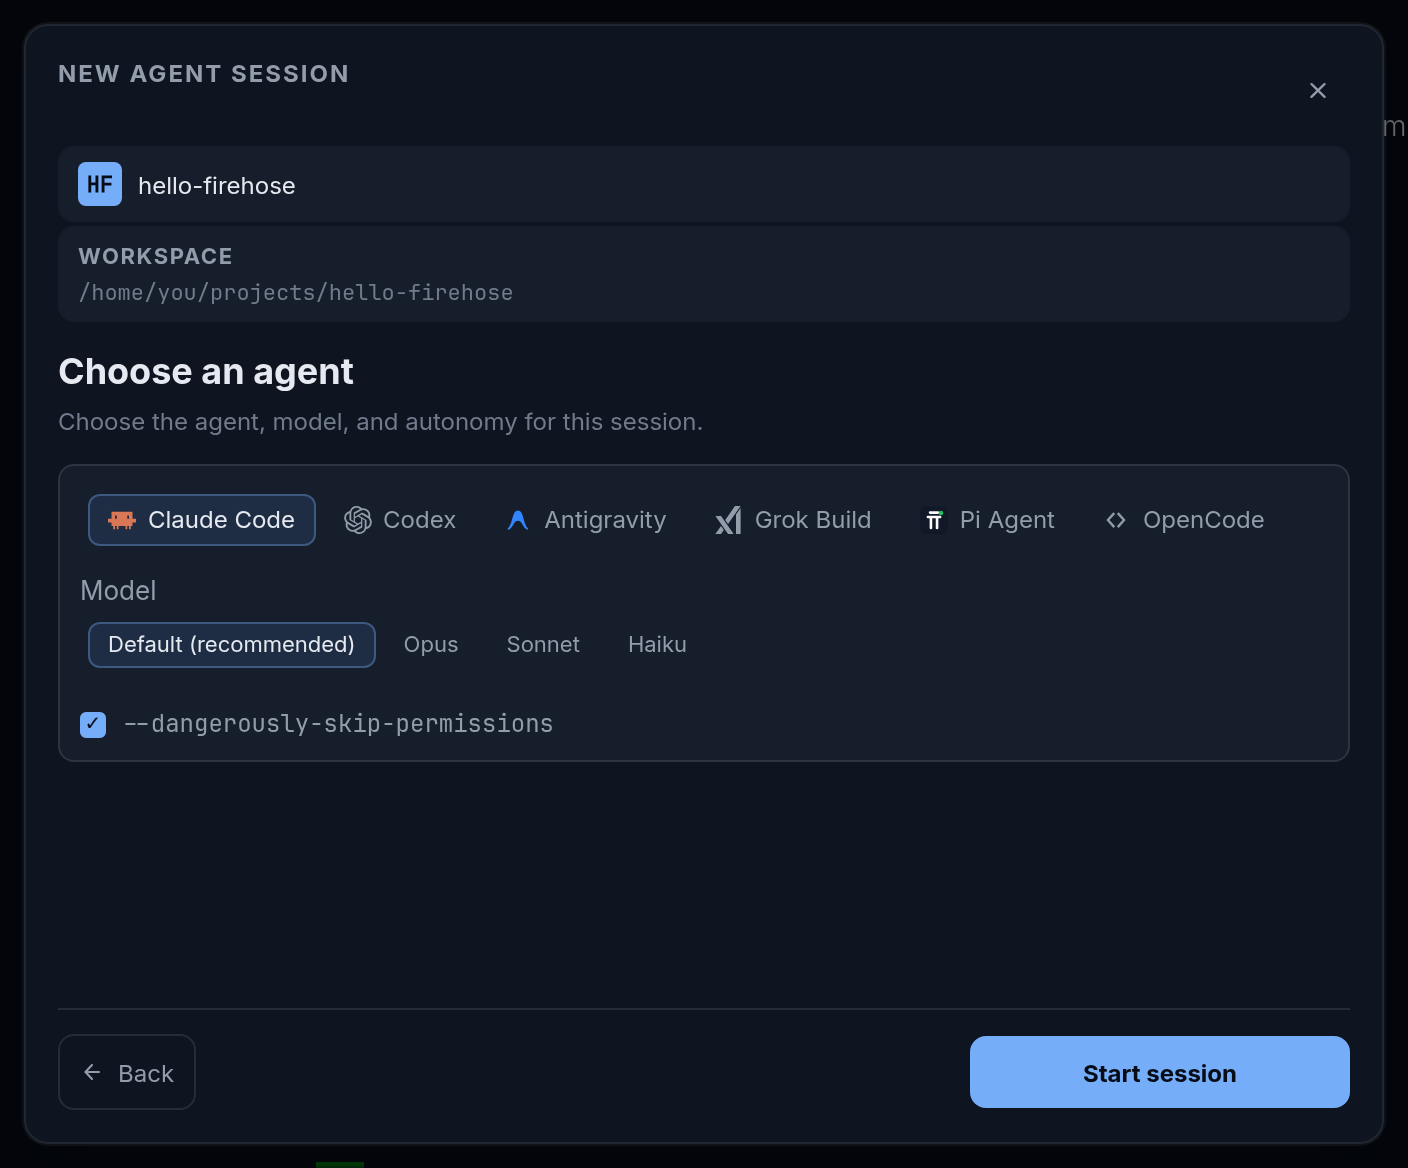
These are three separate checks: project discovery, model discovery, and session startup. A model list alone does not prove the provider can handle your account’s requests. Complete the small explanation task to check an actual response.
If a check fails, note the project name, provider, selected model, exact error, and the last step that worked. See startup troubleshooting.
Use more than one server
Section titled “Use more than one server”In the hosted app, each browser tab chooses its own server. Reloading a tab keeps its selected address. You can connect another tab to a different server.
To switch servers, open Settings (the gear icon at the bottom of the icon rail on the far left). Under Server connection, enter the other server’s address and select Save and connect. Switching preserves the previous server’s stored workspace for when you return.
Forget this server clears that server’s stored workspace, including drafts, annotations, open files, and project ordering. Use switching when you intend to return; read the confirmation before forgetting a server.
If you can’t connect
Section titled “If you can’t connect”On the Firehose computer, run firehose status to check that Firehose is running. From another device, check that the Firehose computer is awake and that both devices are signed in to the same Tailscale account. Follow connection troubleshooting for the next checks.
Once connected, start your first session.